Every everyday foundry calculation in one program, step by step.
This guide shows you how to use each module of JoseCast Suite with a worked example. You do not need any previous experience with the program. Every picture shows exactly where to click (red frame and number); the numbers in the text match the numbers in the picture.
What JoseCast Suite does: it brings the calculations of a sand foundry together in one program: the lowest-cost furnace charge and the melting cost, gating and riser design, fill time, cast iron and steel pouring temperatures, and the metal, flask and sand quantities and cost from a STEP model. Every result comes with its formula and its literature source.
Contents
- Before you start
- The start screen
- How every module works
- Furnace Charge Analysis
- Gating & Riser Design
- Fill Time Analysis
- Cast Iron Parameters
- Steel Casting Parameters
- 3D & Mass
- Calibration: adapting the program to your foundry
- Your files
- Scope and limits
- Quick troubleshooting
1. Before you start
| Requirement | |
|---|---|
| Operating system | Windows 10 or Windows 11, 64-bit |
| Internet | Not needed for calculations |
Install the program with the setup file or from Microsoft Store, then start JoseCast Suite from the Start menu.
First start. At the first start the program prepares its thermodynamic (CALPHAD) databases. This can take about half a minute; later starts are faster. While it starts, the program also checks that all of its parts are present and recalculates worked examples from the literature to make sure the calculation core is correct.
2. The start screen
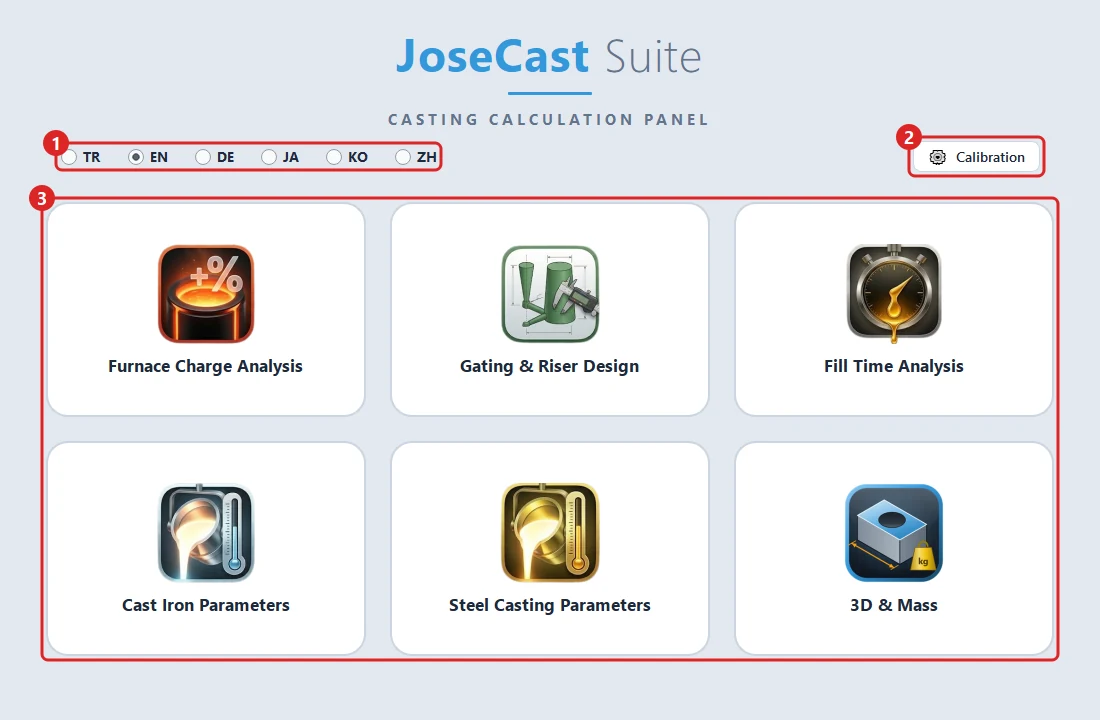
- (1) Language — choose the language of the program. The change is immediate, also in windows that are already open.
- (2) Calibration — adjust the coefficients of the fill-time and pouring-temperature calculations to your own foundry (see section 10).
- (3) Modules — click a tile to open a module. Each module opens in its own window, and you can open the same module several times (for example to compare two designs side by side).
3. How every module works
All calculation modules have the same layout:
- Left: the inputs, grouped in boxes. Every field already shows a typical value, so you can see what kind of value is expected.
- Right: the results. At the top the most important results are shown in large cards; below them the detailed results, each with its formula.
- CALCULATE (or the Enter key) runs the calculation. Nothing is calculated while you type.
- Report opens the result as a printable page in your web browser. From the browser you can print it or save it as PDF. The report shows exactly the result on the screen.
If an input is missing or wrong, a red message above the results tells you which field to correct. Orange notes below the results explain important points about the result (for example which formula was used).
4. Furnace Charge Analysis
What it does: finds the cheapest mix of your charge materials (scrap, pig iron, ferro-alloys …) that reaches your target analysis, and optionally calculates the melting cost of the heat.
Step 1 — Inputs and material list
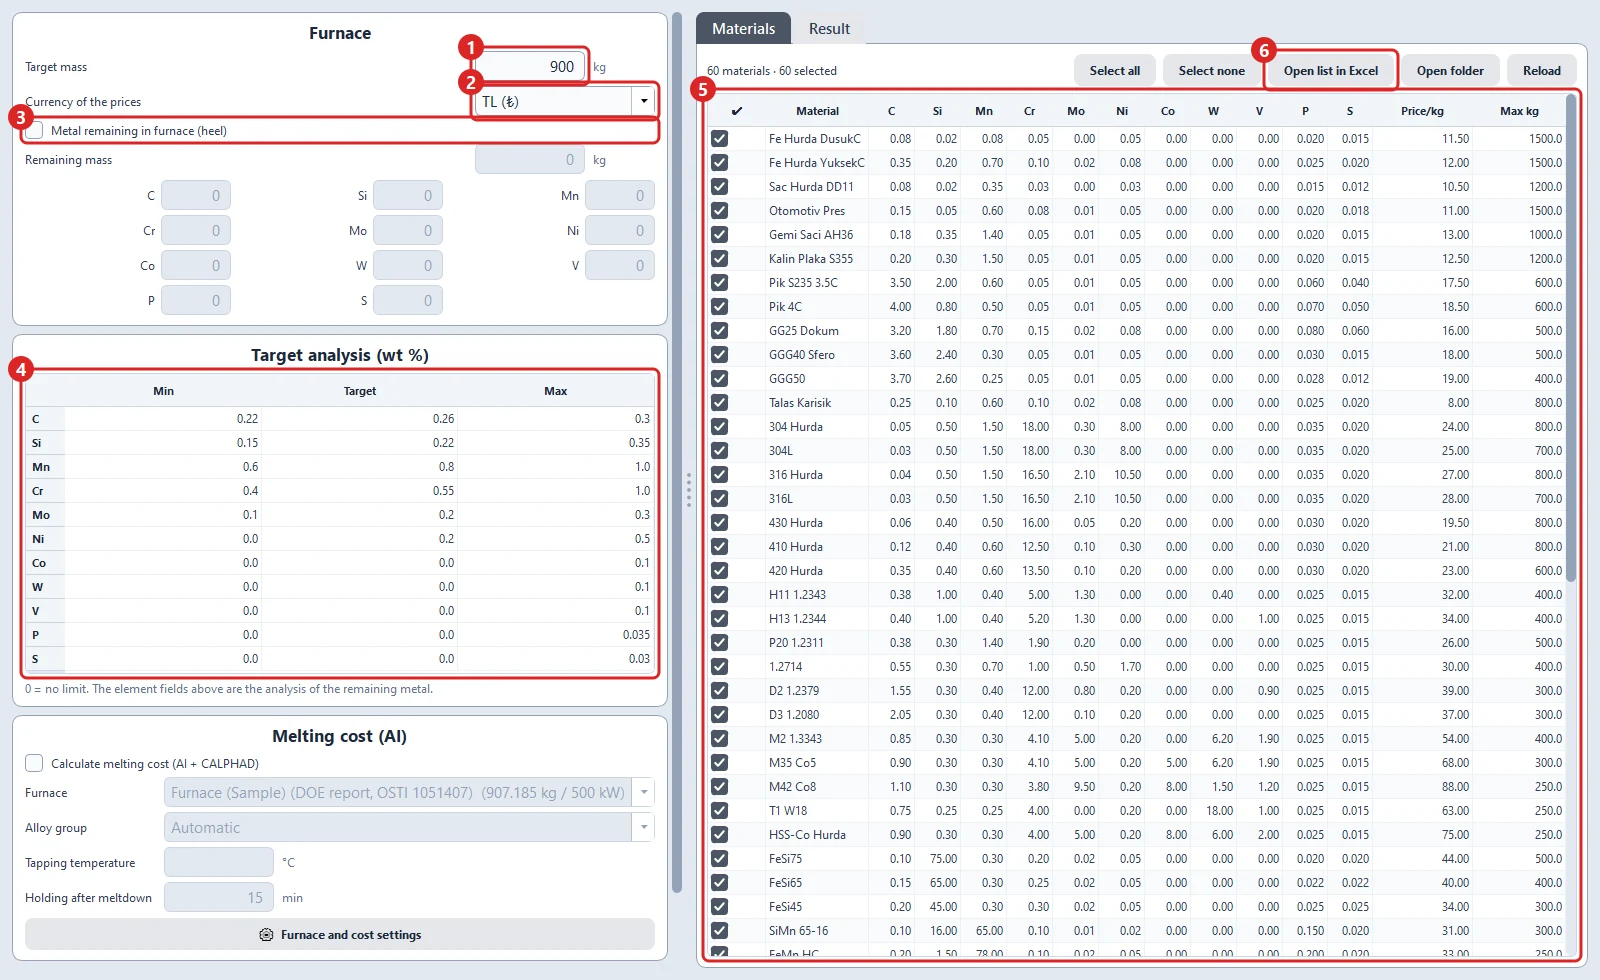
- Target mass (1) — how much liquid metal you want to melt. Example: 900 kg.
- Currency of the prices (2) — TL, Euro or Dollar. All prices in the program use this currency; no conversion is made.
- Metal remaining in furnace (heel) (3) — tick it if metal from the previous heat stays in the furnace. Then enter its mass and its analysis in the fields below; the program takes it into account.
- Target analysis (wt %) (4) — for each element enter Min, Target and Max in weight %. A 0 means no limit.
- Material list (5) — your charge materials with their analysis, Price/kg and Max kg (how much of it you have). Untick a material to leave it out of this calculation.
- Open list in Excel (6) — the list is an Excel file in your user folder. Open it, add your own materials and prices, save it, then click Reload.
Step 2 — (Optional) melting cost
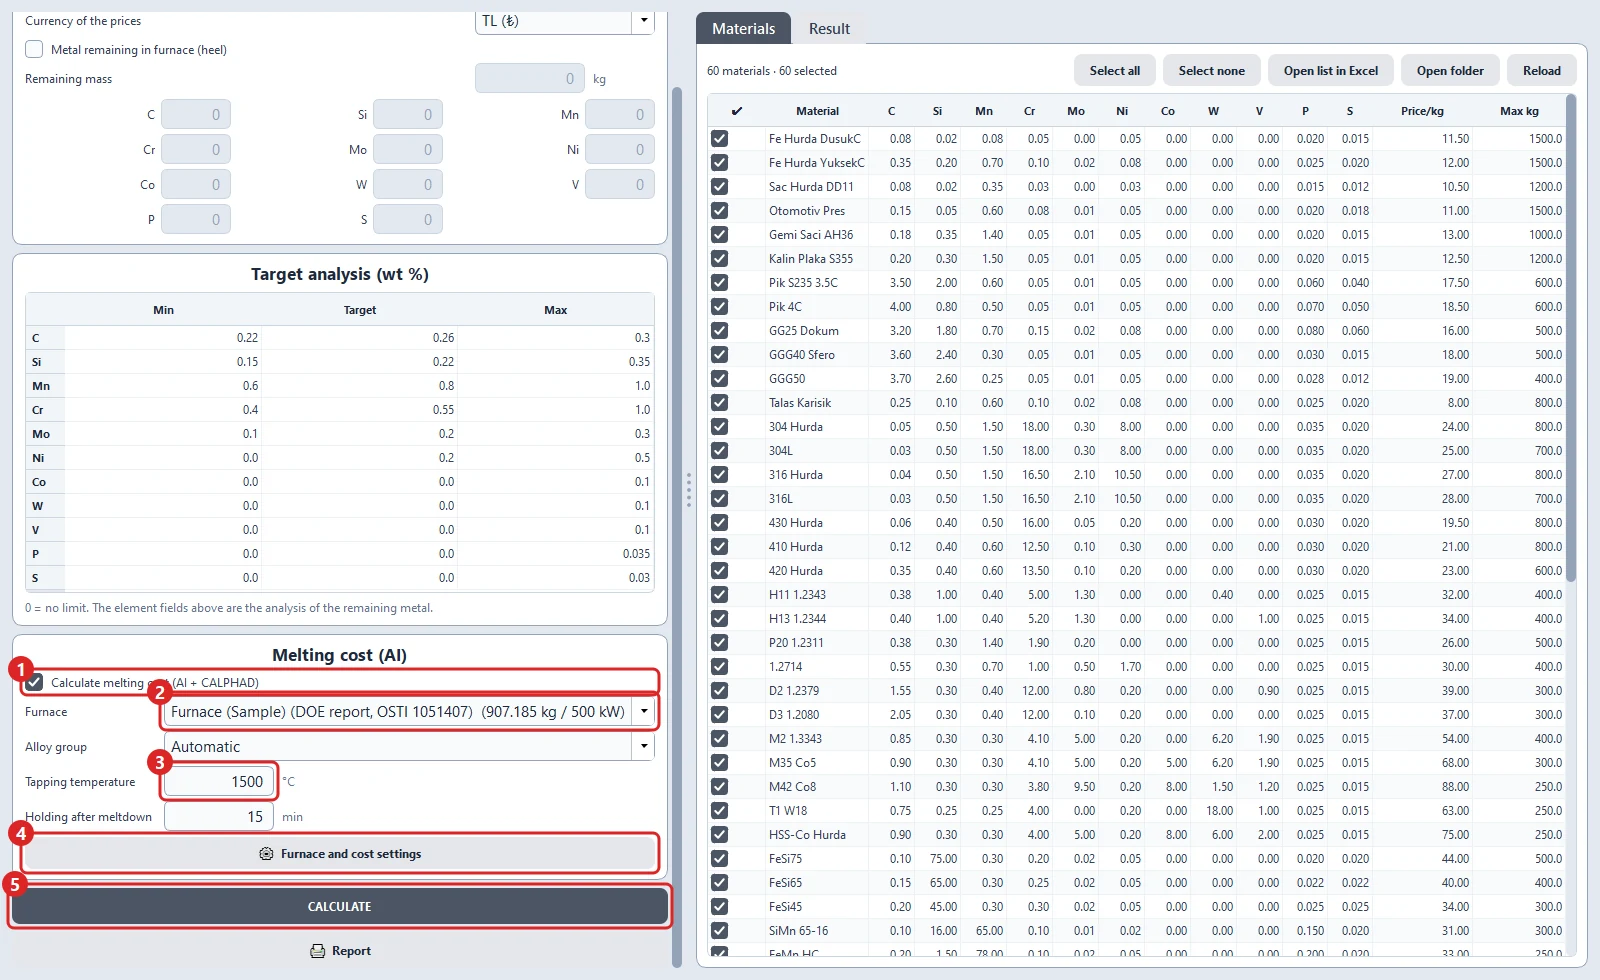
- Tick Calculate melting cost (AI + CALPHAD) (1).
- Choose the Furnace (2). The program comes with an example induction furnace whose real measured heats come from a published U.S. Department of Energy report.
- Enter the Tapping temperature (3) and the Holding after meltdown.
- Furnace and cost settings (4) opens the settings window (see step 4).
- Click CALCULATE (5).
Step 3 — Results
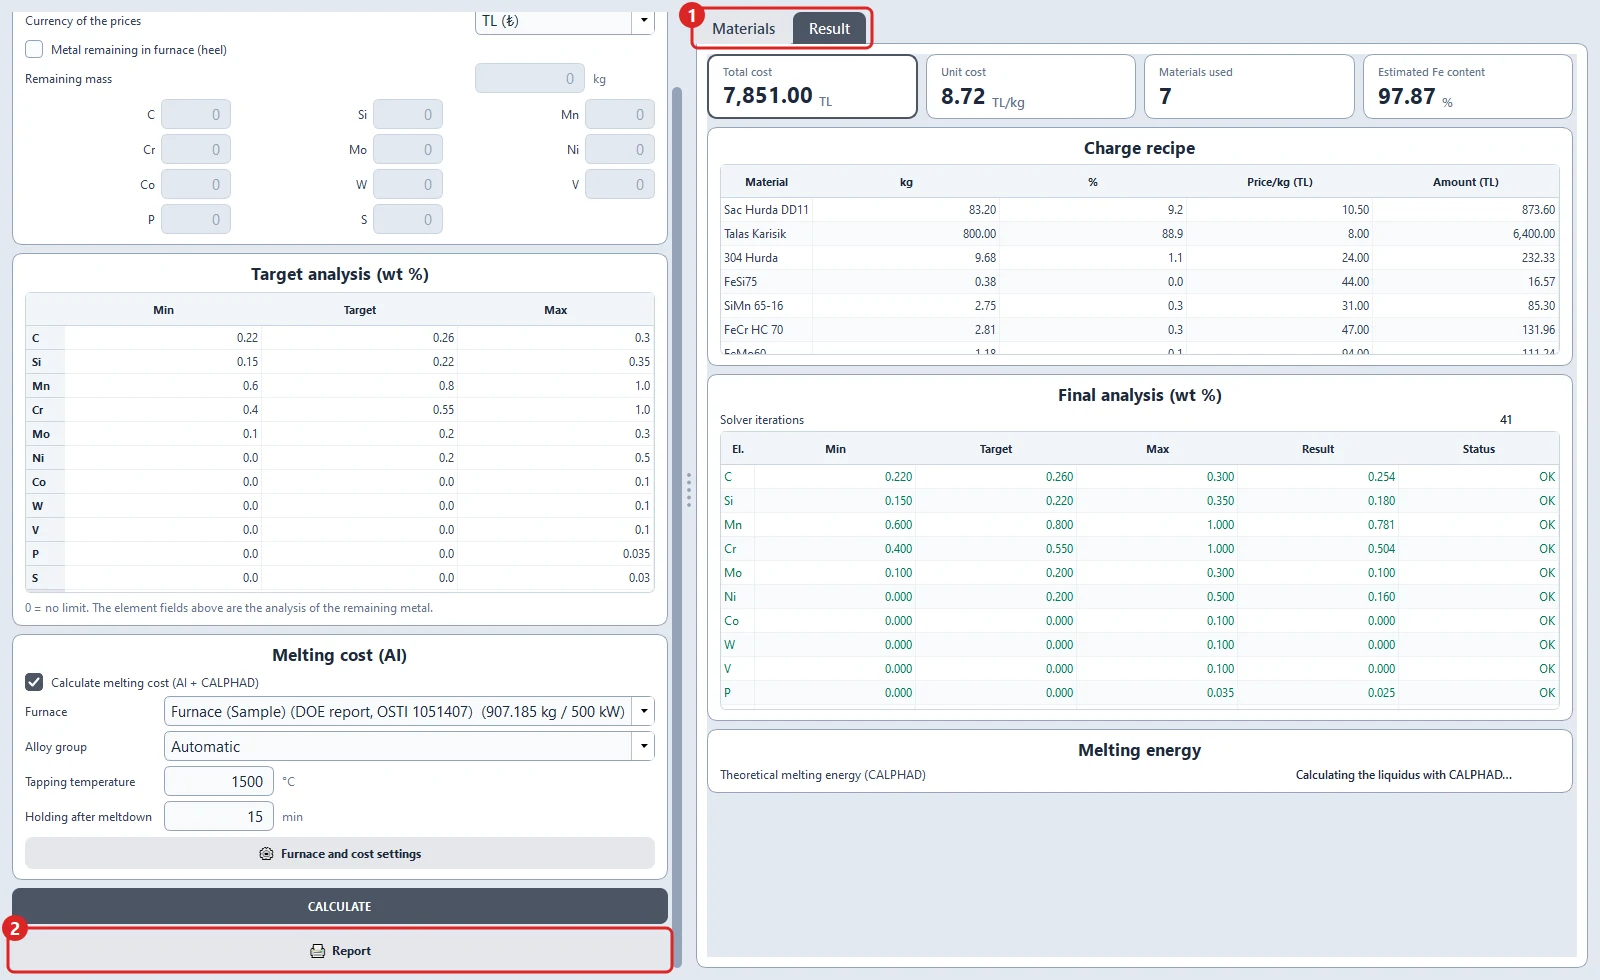
The program switches to the Result tab (1):
- Cards: Total cost, Unit cost, Materials used and Estimated Fe content.
- Charge recipe: how many kg of each material to charge, and its cost.
- Final analysis (wt %): the analysis the melt will have, element by element, with the status OK, Below or Above.
In the example the cheapest charge for 900 kg uses 7 materials. Report (2) opens the printable report.
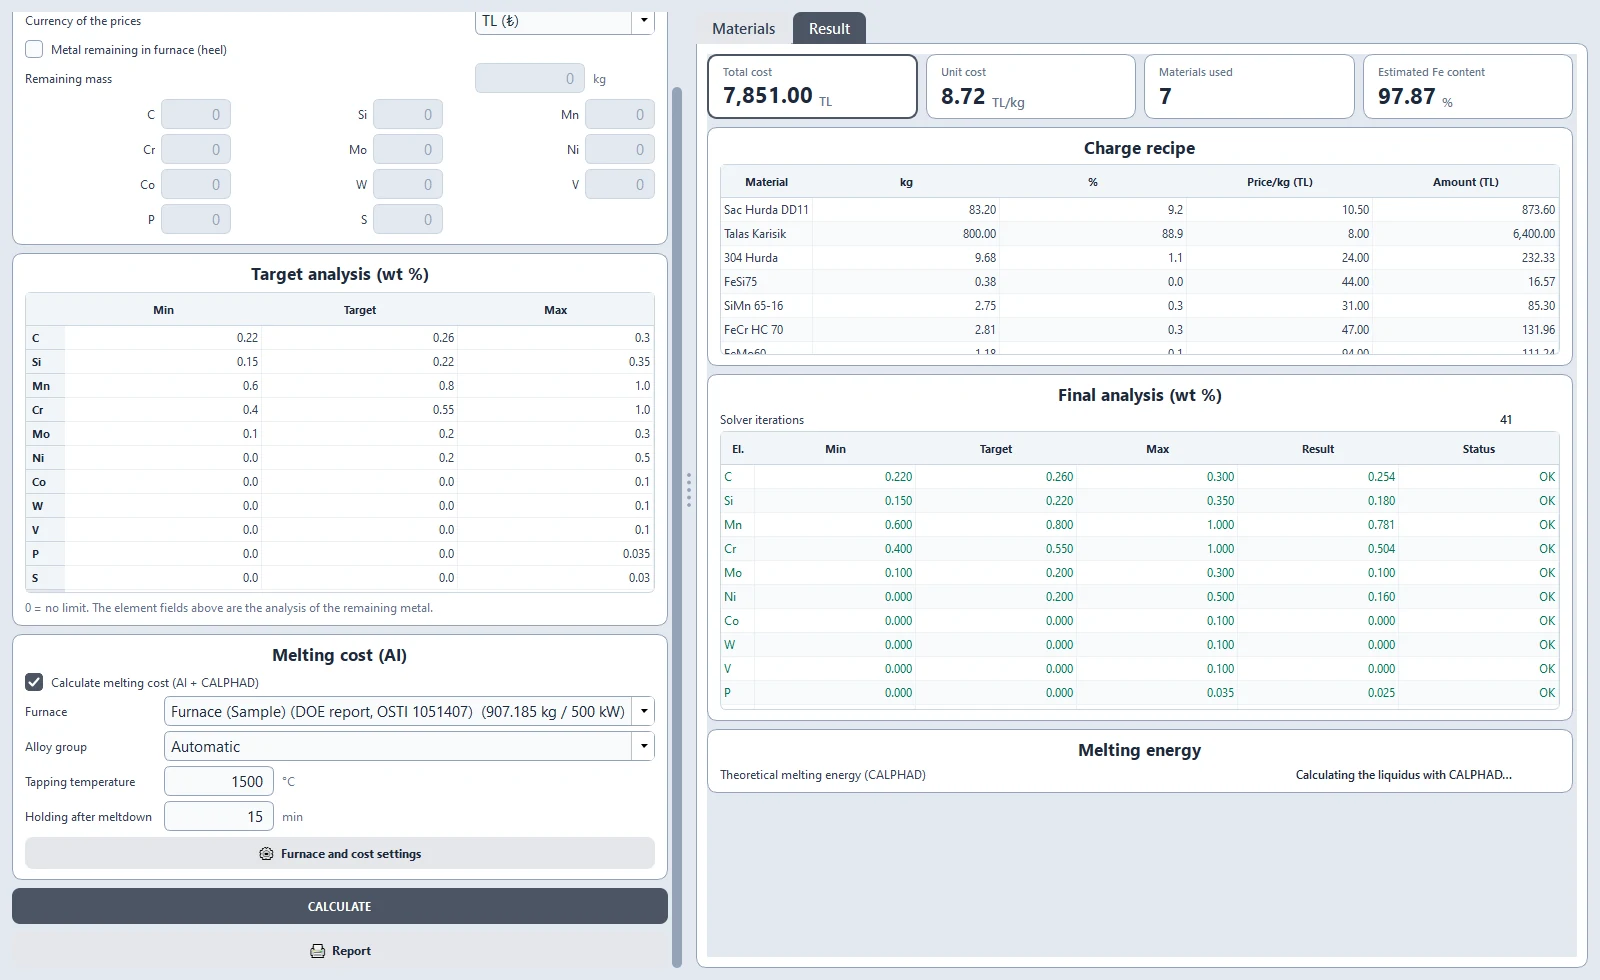
With the melting cost switched on, the section Melting energy below shows the theoretical melting energy (from CALPHAD), the estimated consumption, the melting time and the cost per heat item by item: charge material, energy, labour, refractory and other costs. The theoretical energy is calculated a few seconds after the charge; until then the field shows that it is being calculated.
If the program cannot reach the target with the materials you selected, it says so and tells you which limit to relax.
Step 4 — Furnace and cost settings
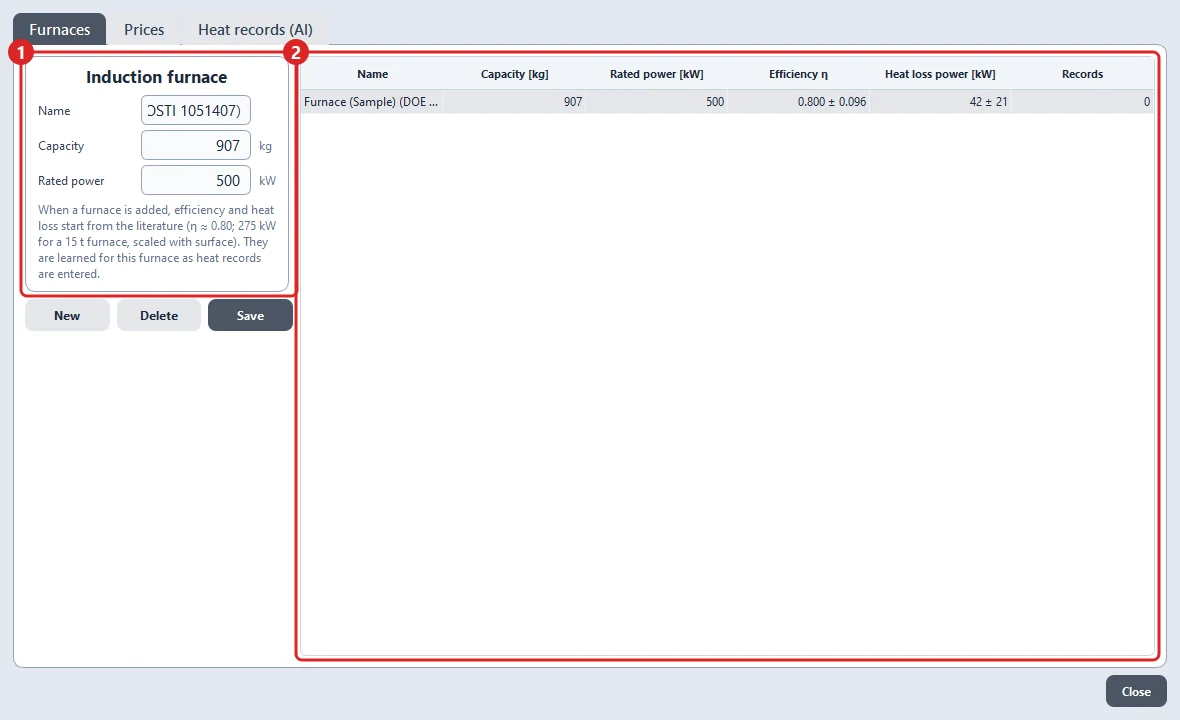
Furnaces: enter your furnace's Name, Capacity and Rated power (1) and click Save. The table (2) lists your furnaces with their efficiency and heat loss.
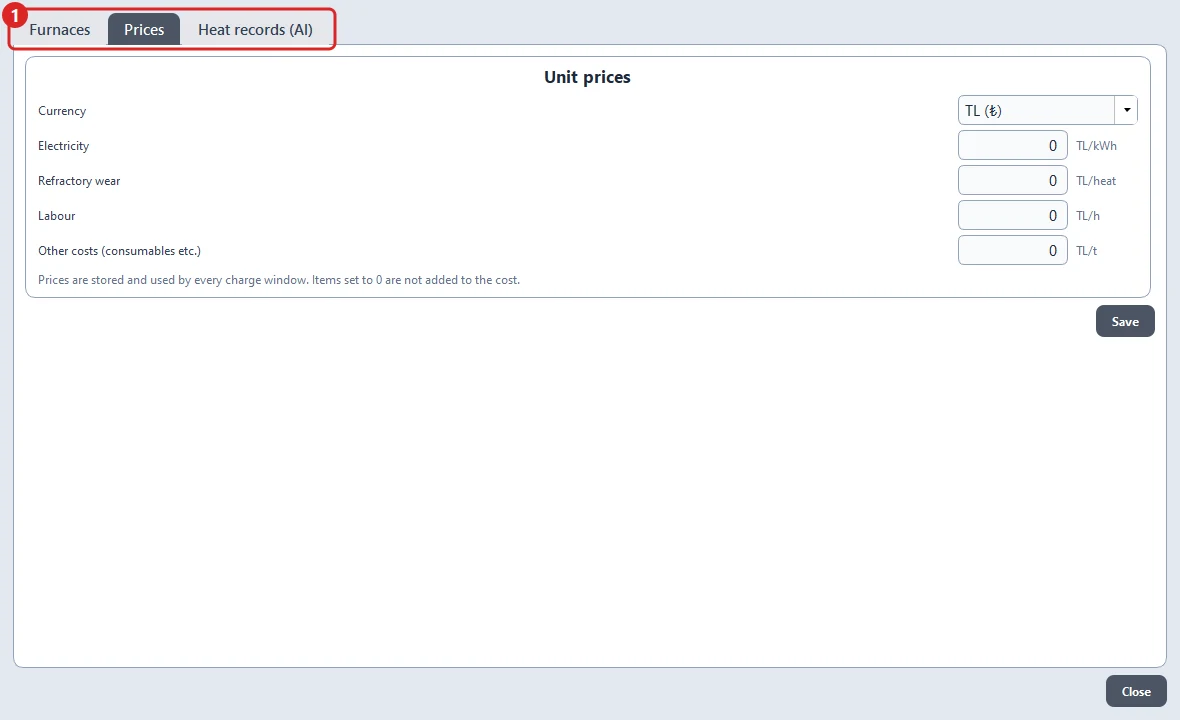
Prices (1): electricity, refractory wear per heat, labour per hour and other costs per tonne. Items left at 0 are not added to the cost.
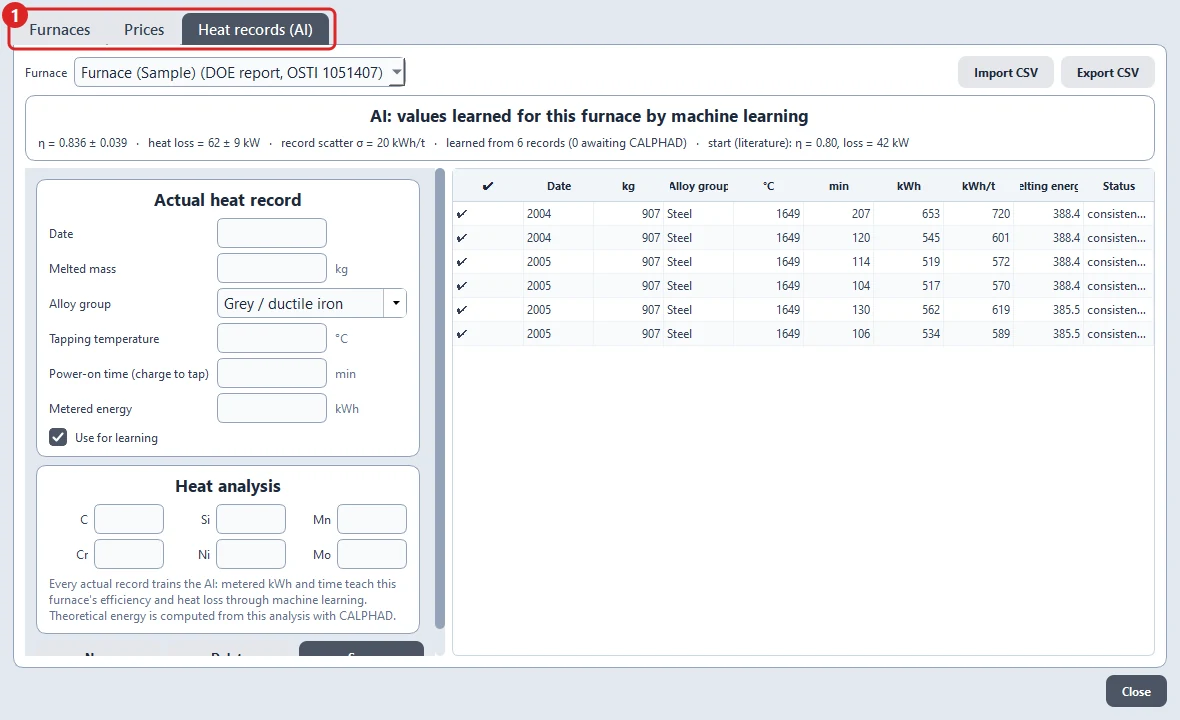
Heat records (AI) (1): enter real heats of your furnace: date, melted mass, tapping temperature, power-on time, the metered energy (kWh) and the analysis. Every record teaches the program your furnace: its efficiency and heat loss are learned from your own data (Bayesian machine learning), so the melting cost becomes more accurate the more records you enter. Records that do not fit the others are marked and not used for learning. You can also import and export records as CSV.
5. Gating & Riser Design
What it does: sizes the sprue, runner and ingates for your casting, gives the metal velocity in each section and, if you want, a preliminary riser.
Step 1 — Metal, casting and gating type
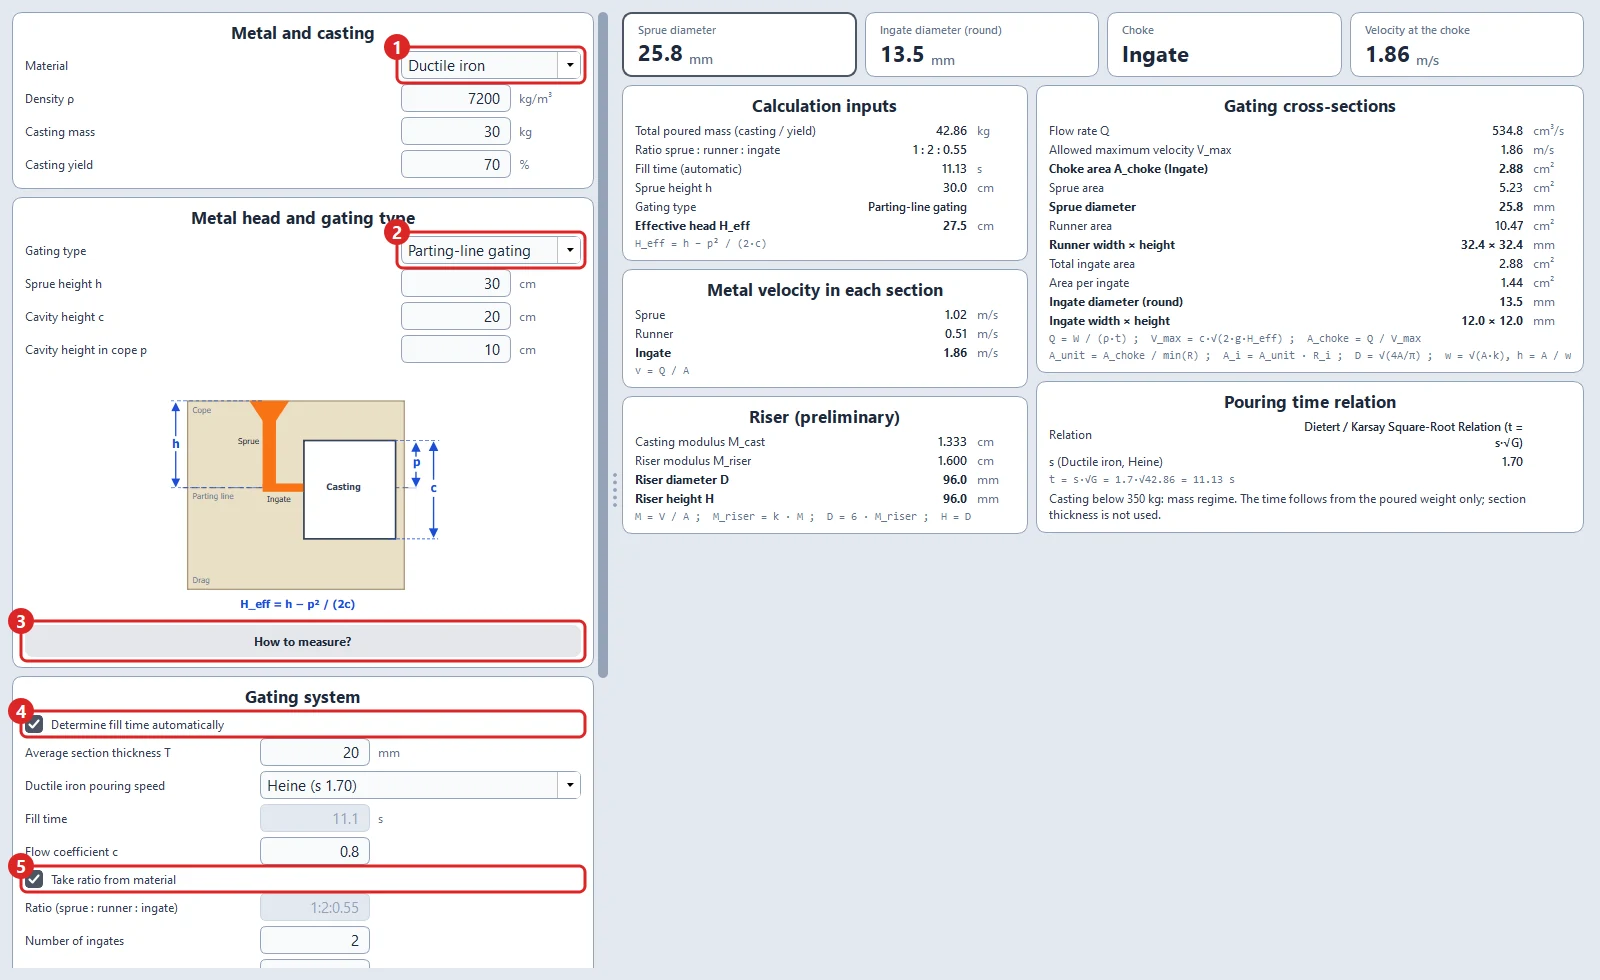
- Material (1) — steel, grey iron, ductile iron or a custom density. Then enter Casting mass and Casting yield. Example: ductile iron, 30 kg, 70 %.
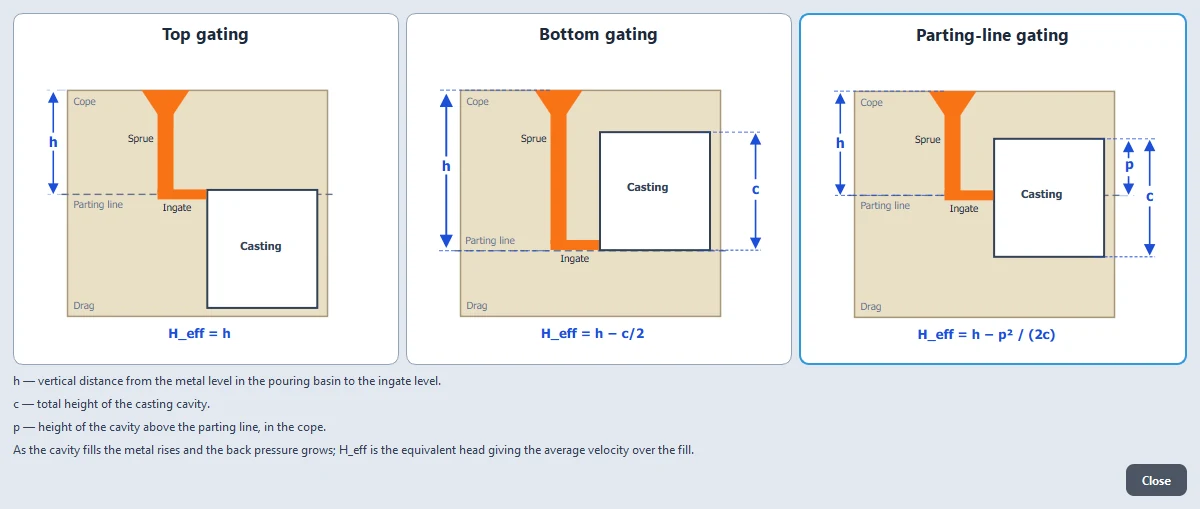
- Gating type (2) — top, bottom or parting-line gating, with Sprue height h, Cavity height c and Cavity height in cope p. Example: parting line, h = 30 cm, c = 20 cm, p = 10 cm.
- How to measure? (3) — shows on a drawing exactly how h, c and p are measured for each gating type.
- Determine fill time automatically (4) — on: the fill time comes from the Fill Time Analysis (section 6). Off: enter your own fill time.
- Take ratio from material (5) — on: the usual sprue : runner : ingate ratio of the material is used. Off: enter your own ratio, for example 1:2:2.
Step 2 — Options and calculation
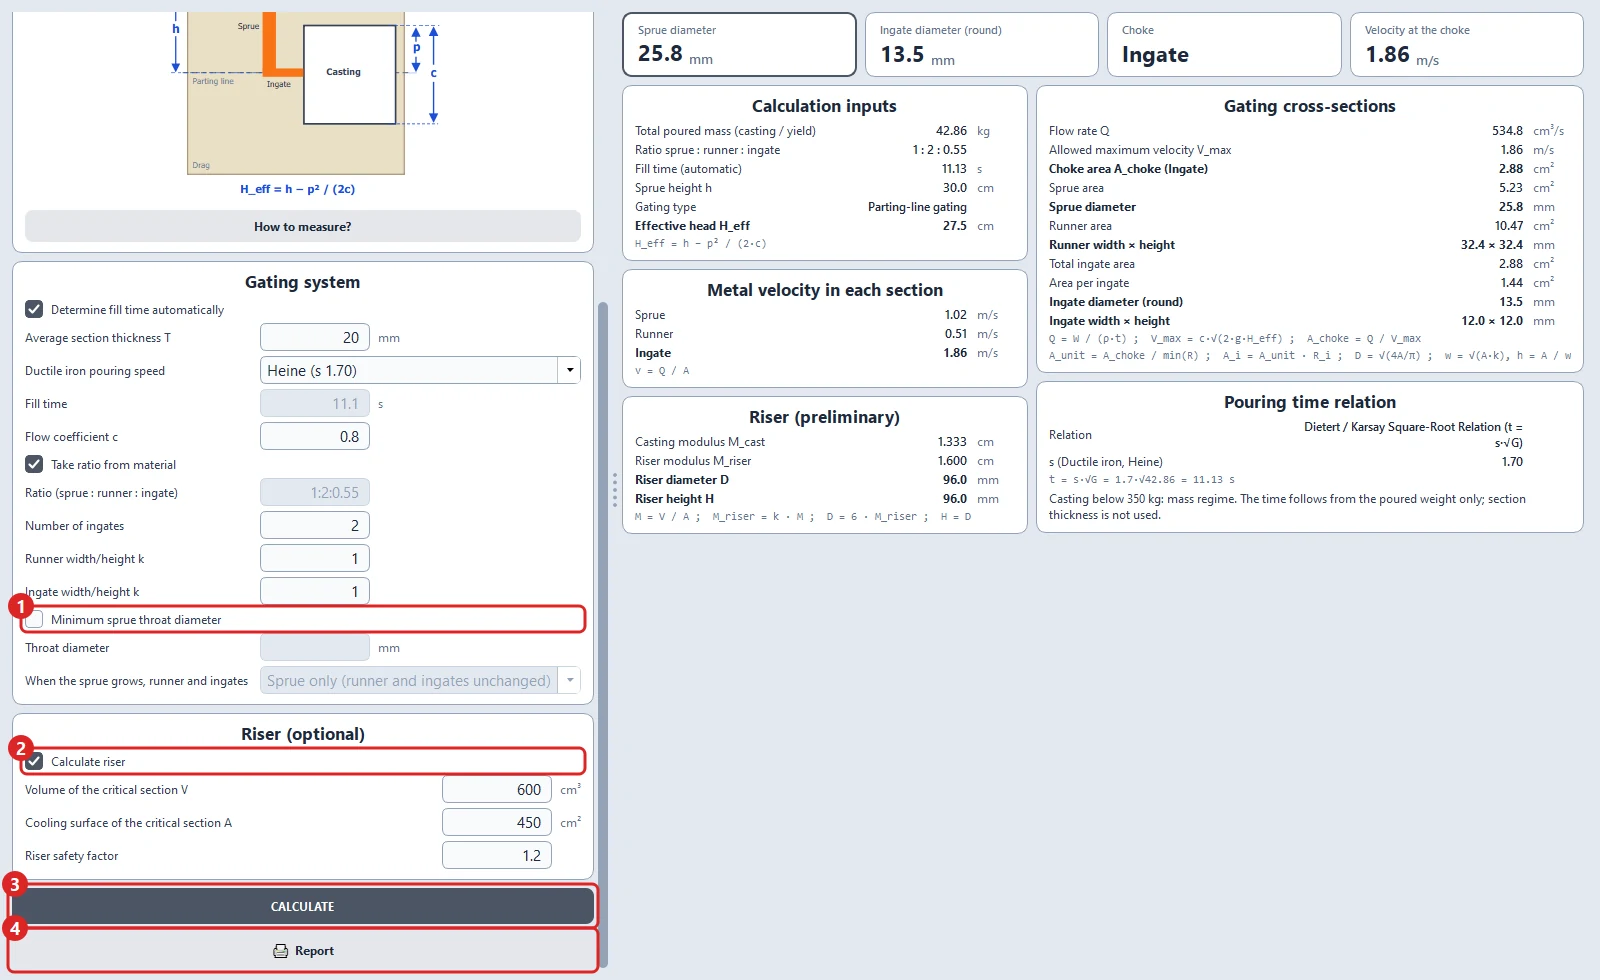
- Minimum sprue throat diameter (1) — for small castings the formula can give a sprue too narrow to pour in practice. Enter your foundry's minimum sprue diameter and choose how the other sections should follow. The program then explains in plain words what changed and gives the pourer a simple instruction (how many kg in how many seconds).
- Calculate riser (2) — enter the volume and cooling surface of the critical section; the program gives a preliminary riser by the modulus method.
- CALCULATE (3), then Report (4) if you want a printout.
Results (right side): sprue diameter, ingate diameter, which element is the choke, and the velocity at the choke in large cards; below them the cross-sections and dimensions of sprue, runner and ingates, the velocity in each section, the riser diameter and height, and the fill-time relation that was used. In the example: sprue 25.8 mm, ingate Ø 13.5 mm, choke at the ingates, 1.86 m/s.
6. Fill Time Analysis
What it does: calculates the target fill time and the mean pouring rate of a casting.
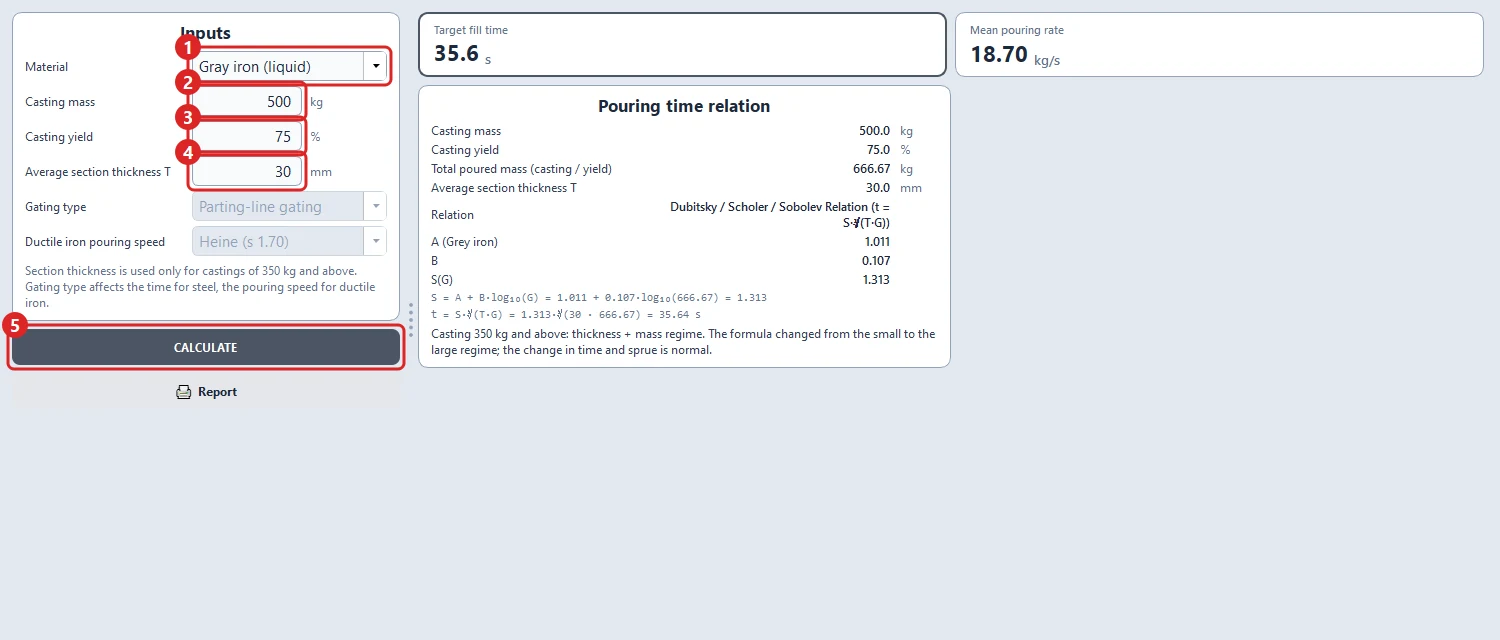
- Material (1) — steel, grey iron or ductile iron.
- Casting mass (2) and Casting yield (3) — the program calculates the poured weight from them.
- Average section thickness T (4) — used only for castings of 350 kg and above.
- For steel the gating type changes the time; for ductile iron, the pouring speed. Fields that do not apply are greyed out.
- CALCULATE (5).
Two relations from the literature: below 350 kg the time depends on the poured weight only; from 350 kg up to 3000 kg the average section thickness is also used. The result shows which relation was used and its coefficients. Example: grey iron, 500 kg, 75 %, 30 mm → about 35.6 s and 18.7 kg/s.
The coefficients can be adapted to your foundry under Calibration (section 10).
7. Cast Iron Parameters
What it does: gives the liquidus of your cast iron and the temperatures at which to pour it: entering the mould, at the start of the ladle and, for ductile iron, at Mg treatment.
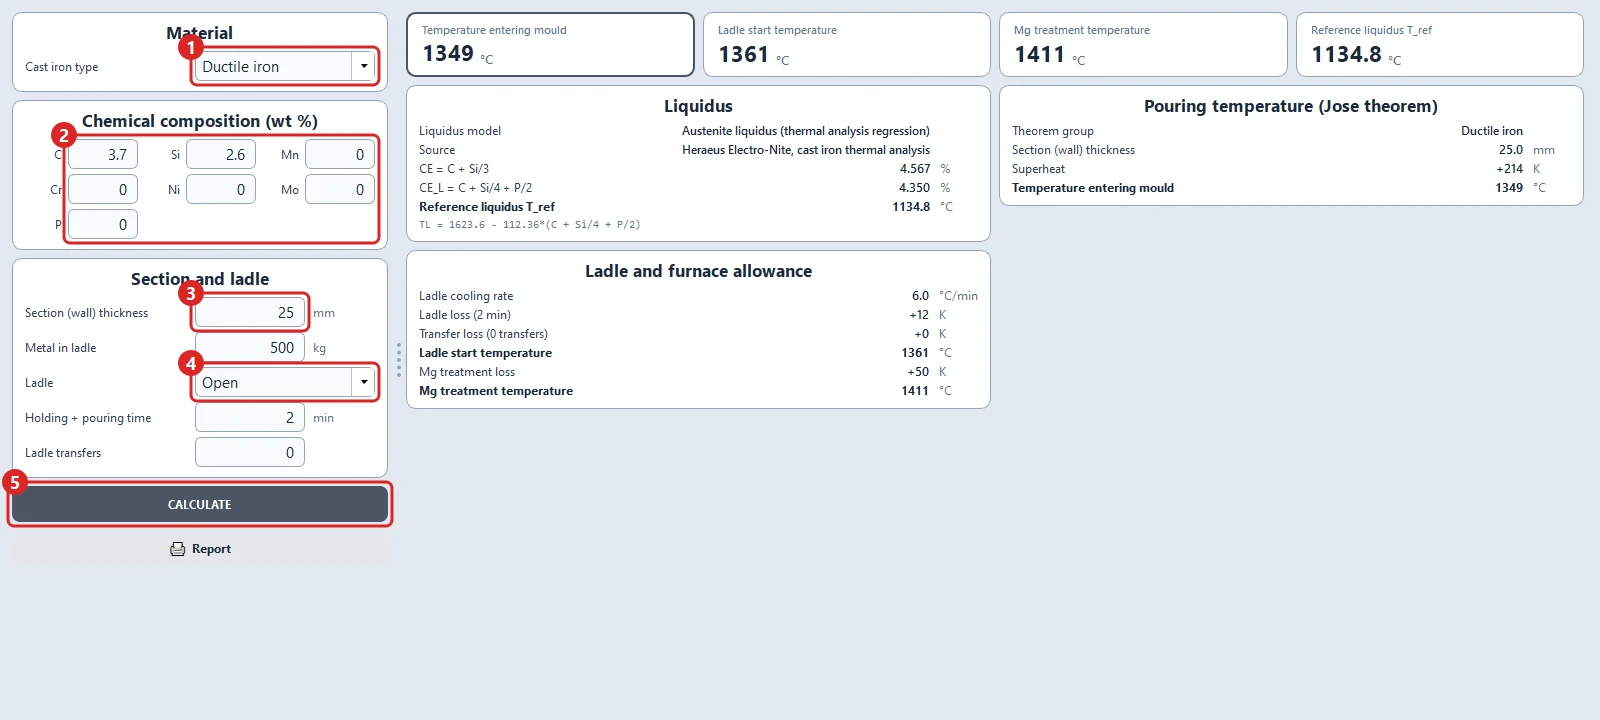
- Cast iron type (1) — grey, ductile, white / high-chromium or Ni-Hard.
- Chemical composition (wt %) (2) — the analysis of your melt in weight %. Example: ductile iron, C 3.7 %, Si 2.6 %.
- Section (wall) thickness (3) — the wall thickness of the casting. Thinner sections need hotter metal.
- Ladle (4) — metal in the ladle, open or lidded ladle, holding + pouring time, number of ladle transfers. The program adds the temperature the metal loses on the way.
- CALCULATE (5).
Results: the Temperature entering mould in the large card, the Ladle start temperature, the Mg treatment temperature (ductile iron) and the Reference liquidus T_ref. The liquidus is given with its model and its literature source. The pouring temperature comes from the program's own Jose pouring temperature theorem.
8. Steel Casting Parameters
What it does: the same as for cast iron, for steels: carbon and low-alloy, tool steels, and austenitic, ferritic, martensitic and duplex stainless steels.
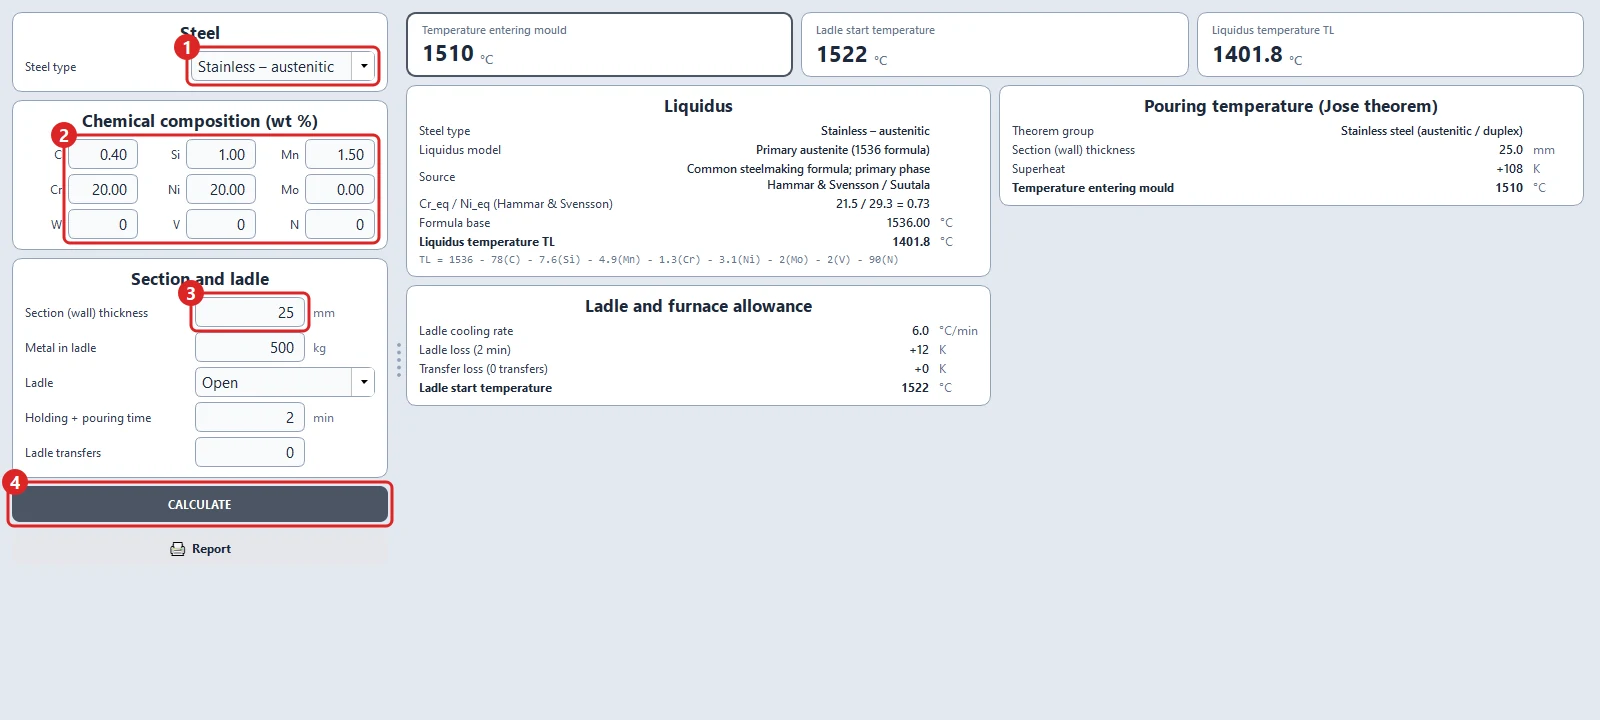
- Steel type (1).
- Chemical composition (wt %) (2) — the analysis in weight %.
- Section (wall) thickness (3) and the ladle fields below it.
- CALCULATE (4).
Results: Temperature entering mould, Ladle start temperature and Liquidus temperature TL, with the liquidus formula, its source and, for stainless steels, the primary solidification phase.
9. 3D & Mass
What it does: opens a STEP model of your casting with its gating, feeders and cores, measures it, and calculates the metal mass, the flask size and the sand quantity and cost.
Step 1 — Open the model and set the metal
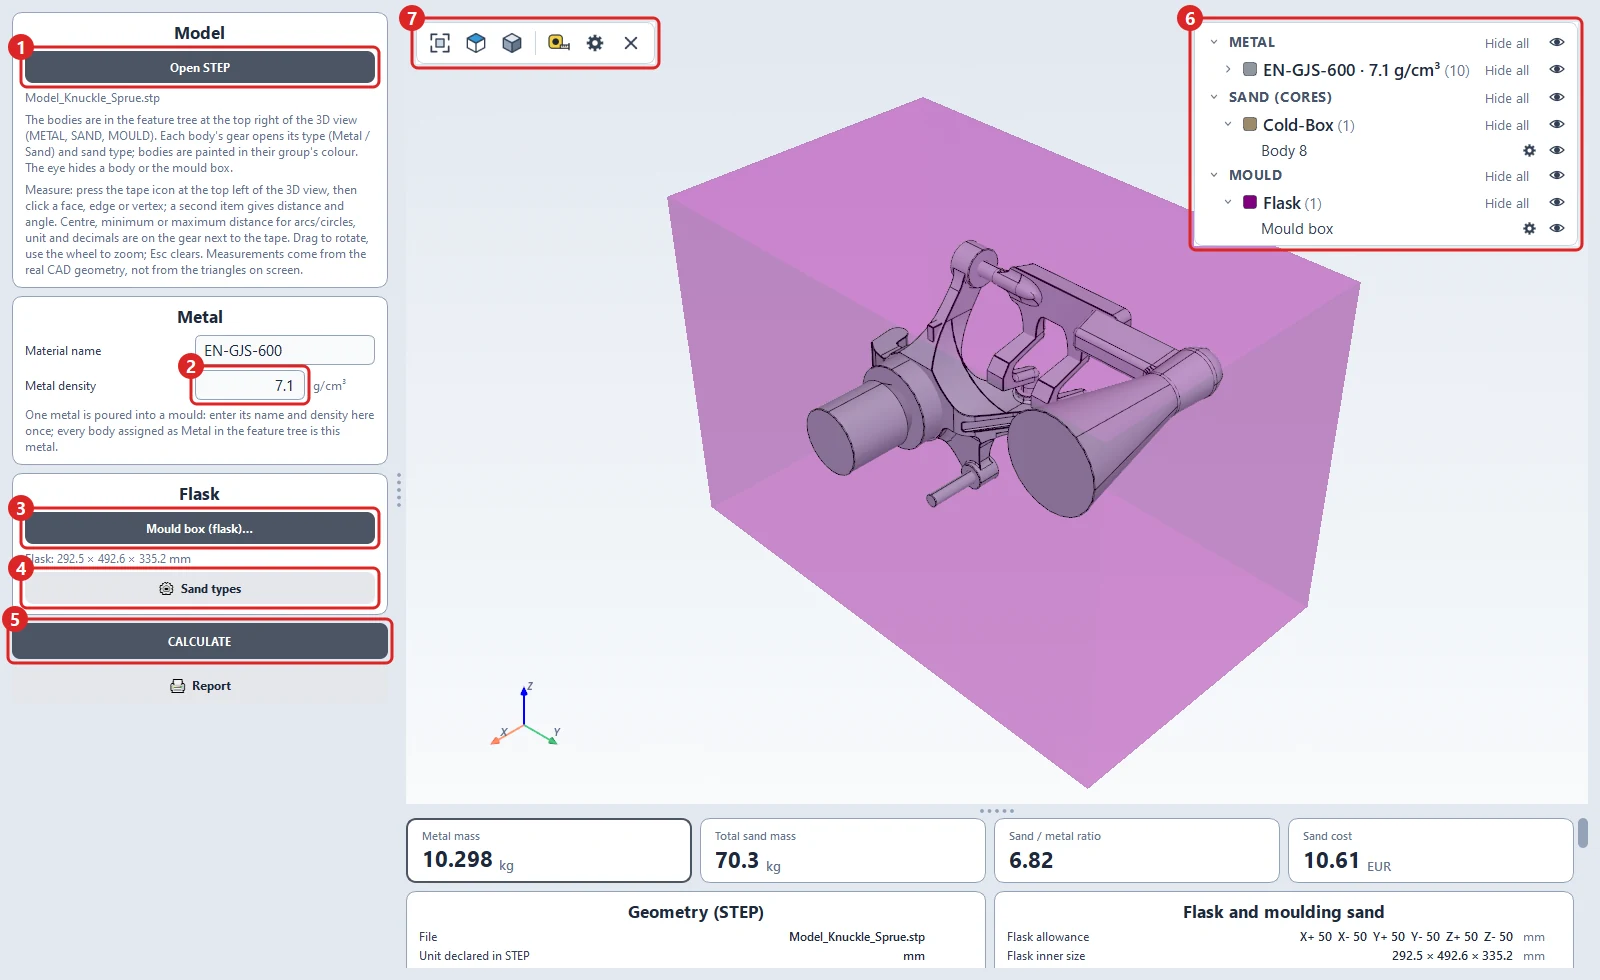
- Open STEP (1) — choose your STEP file (
.stp/.step). The example is the steering-knuckle casting with its full gating and feeding system. - Metal density (2) — one metal is poured into a mould: enter its name and density once here. Example: EN-GJS-600, 7.1 g/cm³.
- Feature tree (6) — at the top right of the 3D view. The bodies are grouped as METAL, SAND (CORES) and MOULD. The gear of a body opens its settings; the eye hides or shows it.
Step 2 — Cores, flask and sand types
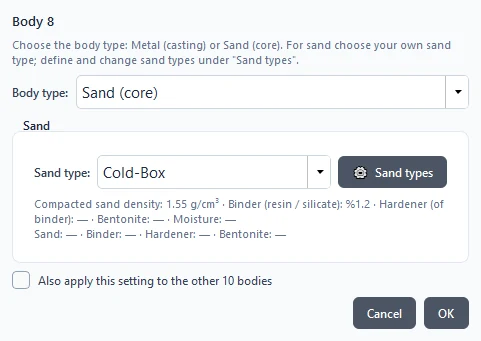
Body settings: every body is Metal (casting) or Sand (core). For a core, choose its sand type. The checkbox Also apply this setting to the other 10 bodies sets many bodies at once. In the example, body 8 is the core.
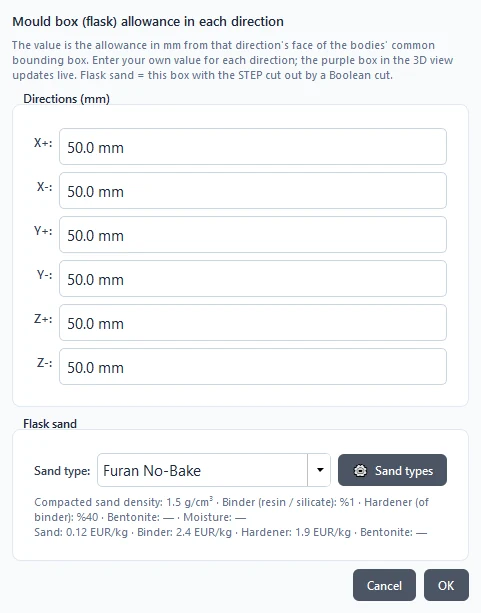
Mould box (flask)… (3): enter how much sand surrounds the model in each of the six directions (mm) and choose the flask sand. The purple box in the 3D view updates while you type. The flask sand is this box with the STEP bodies cut out of it.
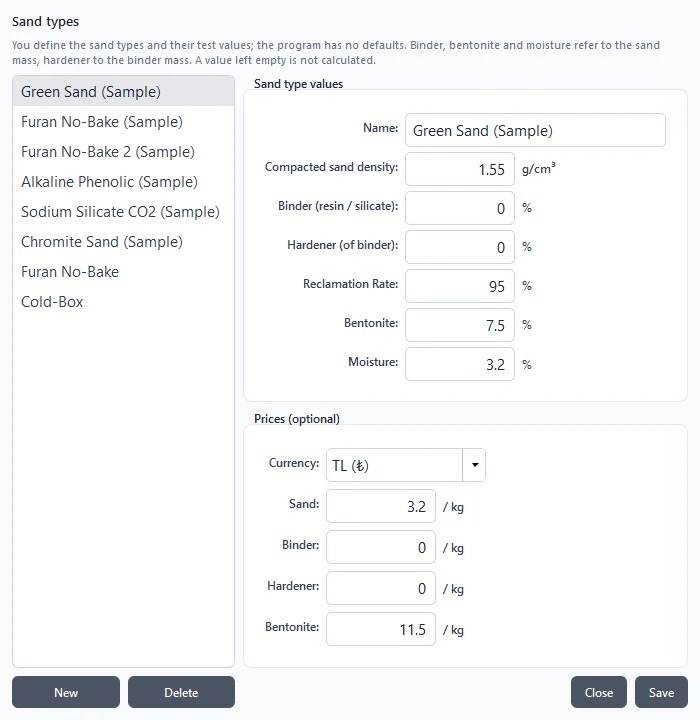
Sand types (4): you define your own sand types with your own test values: compacted density, binder, hardener, reclamation rate, bentonite and moisture, and optional prices. The program has no hidden defaults: an empty value is simply not calculated. A few sample sand types are included to start from.
Step 3 — Calculate
Click CALCULATE (5).
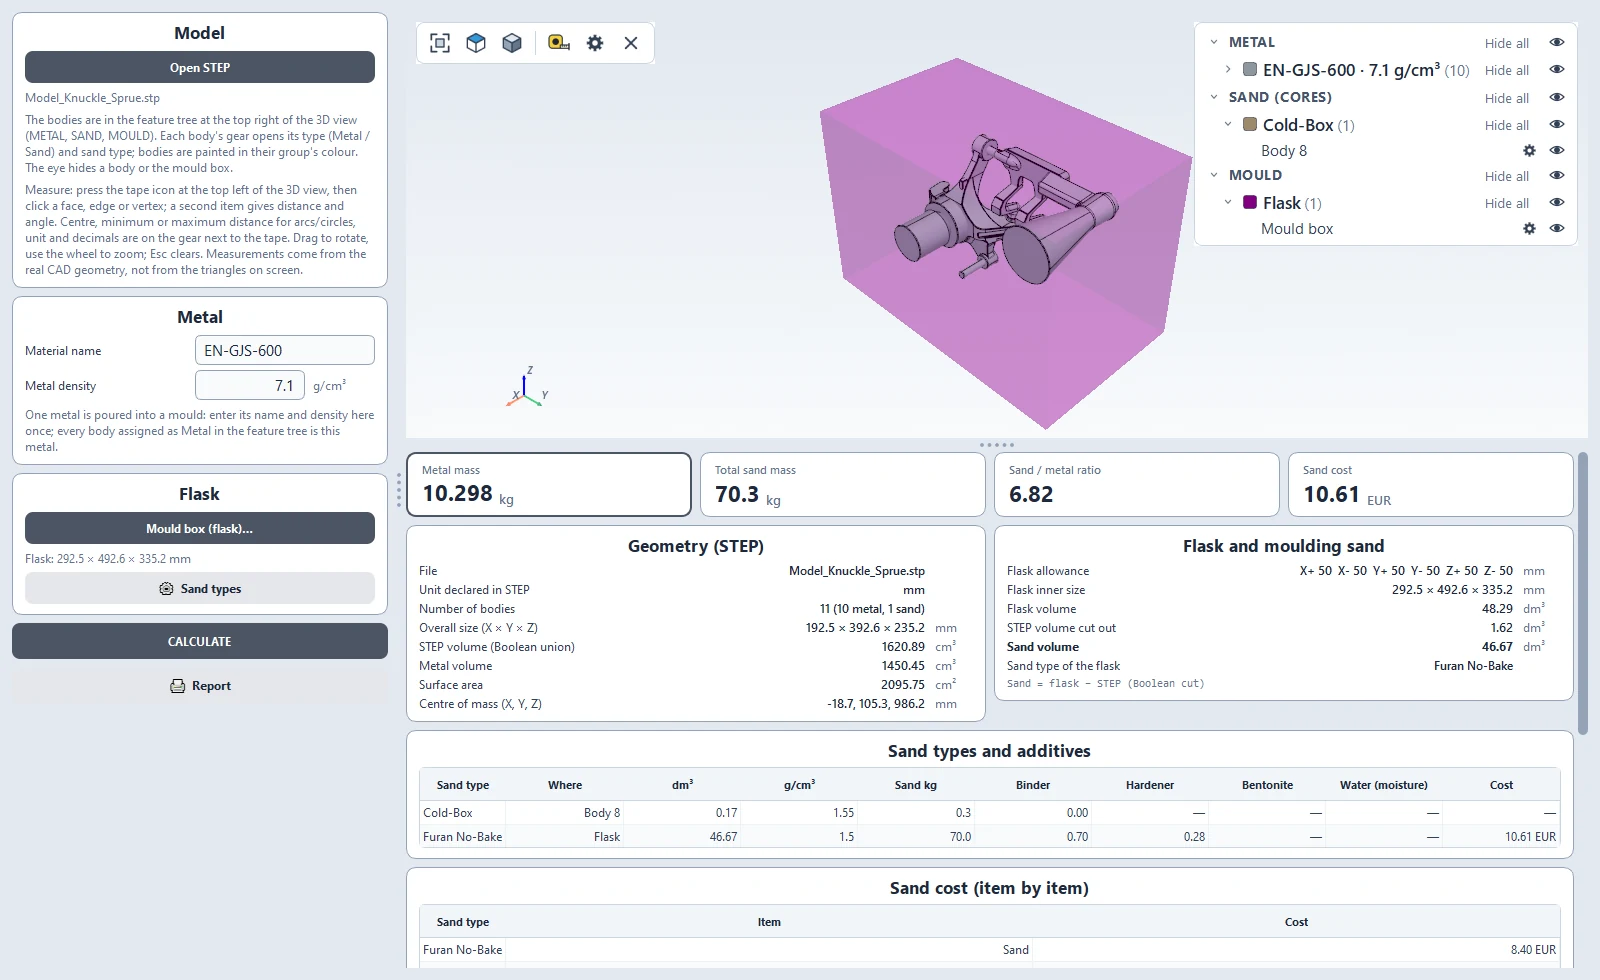
Results: Metal mass, Total sand mass, Sand / metal ratio and Sand cost in the cards; below them the geometry (volume, surface area, centre of mass), the flask size and sand volume, the sand, binder, hardener, bentonite and water quantities for each sand type, and the sand cost item by item. Example: metal 10.3 kg, sand 70.3 kg, sand/metal ratio 6.8.
Measuring: the toolbar at the top left of the 3D view (7) has the standard views, the display style and the tape. Switch the tape on and click a face, edge or vertex: you get its length, diameter, radius or area. Click a second item for the distance and angle between them. Measurements come from the exact CAD geometry, not from the triangles on the screen.
10. Calibration: adapting the program to your foundry
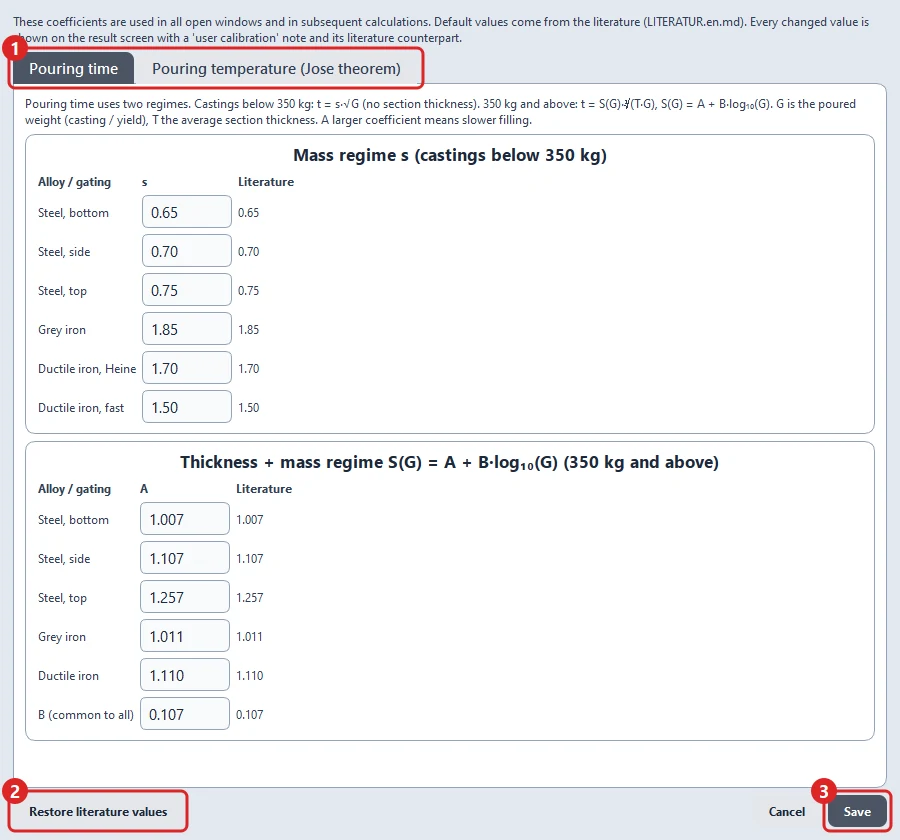
Open it with Calibration on the start screen.
- Pouring time (1): the coefficients of the fill-time relations for each alloy and gating type. The Literature column always shows the original literature value.
- Pouring temperature (Jose theorem): the constants of the Jose pouring temperature theorem and the minimum superheat and minimum pouring temperature of each alloy group.
Restore literature values (2) returns everything to the literature, Save (3) stores your values. The new values are used immediately in all open windows. Every result that uses a changed value shows a "user calibration" note together with the literature value, so a calibrated result can never be mistaken for a literature result.
Change coefficients only on the basis of your own measured castings.
11. Your files
Everything the program reads and writes is in your Documents\JoseCast Suite folder:
| File | Content |
|---|---|
materials.xlsx | Your charge material list |
melt.db | Furnaces, prices and heat records |
settings.json, calibration.json | Language and calibration |
sand_types.json | Your sand types |
The program never writes into its installation folder. Back up this folder to keep your data, or copy it to another computer to take your settings with you.
12. Scope and limits
- Process: sand casting.
- Alloys: steels (carbon, low-alloy, tool and stainless) and cast irons (grey, ductile, white / high-chromium, Ni-Hard).
- Casting size: the fill-time relations are valid up to 3000 kg poured weight.
- Results are engineering calculations from the literature, to support your decisions. Always confirm critical parts with your own experience.
13. Quick troubleshooting
| Problem | Solution |
|---|---|
| A red message appears above the results | It names the field to correct: an empty field, a text instead of a number, or a value out of range. |
| The charge cannot reach the target | Relax the Min/Max limits, select more materials, or raise their Max kg. |
| My new materials do not appear | Save the Excel file, then click Reload. |
| The program cannot write its files | Allow JoseCast Suite in Windows Security under Ransomware protection → Controlled folder access, or in your antivirus program. |
| The STEP file has only one body | It was exported as one merged solid. Export each component (part, feeders, cores …) as a separate body. |
| The melting cost shows "calculating…" | The theoretical energy is computed in the background; wait a few seconds. |
JoseCast Suite — josecastsuite.com